How to Upload Different F2 Picture Blade and Soul
Out of date
The content of this page may be partially or fully out of date.
The game is getting hard sometimes? Here y'all can observe all the important data you might need.
| Contents |
|---|
Contents
|
Beginning the game
To begin the game yous must create a party consisting of four members. There are xi classes that yous can use to create the party:
Warrior (WAR), Rune Knight (RKN), Templar (TMP), Viking (VIK), Thief (THF), Archer (ARC), Pirate (PIR), Sorcerer (WIZ), Necromancer (NEC), Enchanter (ENC) and Cleric (CLR).
Information technology should take the post-obit structure:
Tank - He who protects the whole party, must have much HP and defensive abilities. (Recommended: State of war/TMP/RKN)
Melee Fighter - Strong or fast, or both. He must be a source of sustainable, independent of mana, damage. (Recommended: VIK/THF/ARC/PIR)
Spellcaster - Deals harm with magical spells or supports the rest of the political party so that they tin do the work - you choose. It'southward an essential part of the team, but not necessarily the easiest to keep alive. (Recommended: RKN/NEC/ENC/WIZ)
Healer - Source of healing and support to the residual of party. (Recommended: CLR/TEM, ENC can fit in some risky party builds)
More informations about creating party here.
Party Presets
Here follow a few examples on how you can build your political party:
- Counterbalanced one: WAR, THF, ENC, CLR
- Counterbalanced 2: WAR, ARC, VIK, CLR
- Full Support: TEM, PIR, ENC, CLR
- Full Damage: RKN, VIK, WIZ, CLR
- Total Tank: State of war, VIK, RKN, TEM
- No Magic: VIK, ARC, THF, PIR (very risky and unstable)
- Full Magic: TEM, RKN, ENC, CLR (unstable but very promising)
Of form these are only examples, y'all are not bound to whatsoever of them. You're encouraged to accept your own path :)
Begin of Story
Your first party fellow member (aka y'all this time) awakes from a scary dream in which somebody told him than he will suffer his "counter". He takes his sis to riverbank where a scary wizard, Zerod kidnaps his sis. So a werewolf, which was following Zerod, attacks. You boxing him and, unless you actually try non to, kill him. He says a proper noun when dying - "Thrygul". And so you return to the village and tell the Elders what has merely happened. They say that Thrygul was a necromancer and settled far away in the north, in Blackfire Mountains. They requite you some gilded and tell y'all to take your friends and set out for the Blackfire Mountains in order to salvage "your" sister.
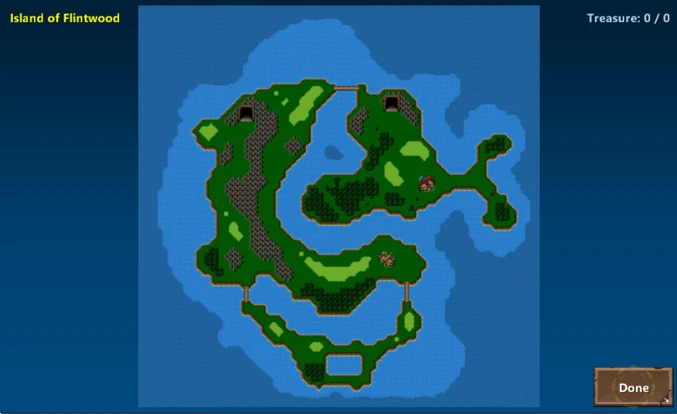
Island of Flintwood
Flintwood
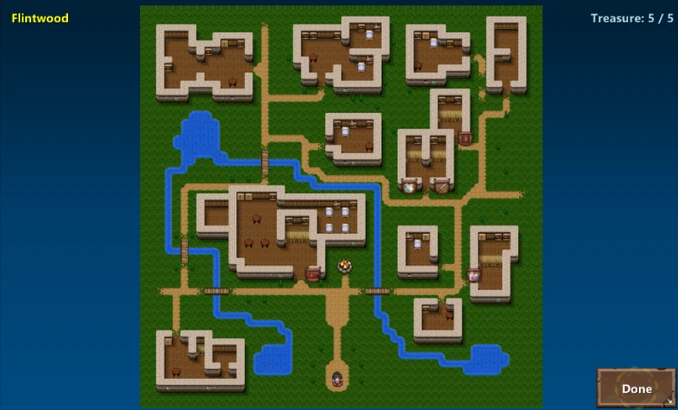
First off
...you should explore the boondocks. In Dragon'due south Bract 2, in every town you tin find these vendors:
INN - Save game and edit your party here. Rest selection revives all the fallen party members and fully restores HP and MP. Also provides a short & weak HP/MP regen buff.
Shops - Buy various items from different NPC, and sell the items you possess. Magic: Spells and Abilities. Item: Potions and Consumables, Armory: Armor, Blacksmith: Weapons
Bivouac NPC - Exchanges monster corpses for Exp; his campfire gives a slight buff to all stats.
More information on these here.
Break all the boxes and don't buy anything, for now.
In Flintwood
...you can find also a Workstation, about which later, and catacombs. Walk thought the tunnel to another entrace. Intermission the boxes for Gem of Dexterity. Return same way, arm your party, take buff from campfire and get out the boondocks! You lot can augment weapons clicking on gem so on weapon to broaden.
More informations most augmenting here .
Arm for Travel
Manifestly, you must arm your party with some stuff to be able to fight monsters. Buy spells for your spellcasters and weapons for anybody. Purchase just one-two spells for every spellcaster and wield at least one weapon for every fellow member. Motility rod from the first member to a spellcaster. Equip everybody in armor for money that has still remained. Spend the bit money that you still have and you can't buy any armor for it in the item shop on potions. Once you complete the above, leave the boondocks.
Outside of Town
Enemies:
- Bluish Fur Bat
- Spider
- Hornet
Get-go affair you detect here is that everywhere are monsters. Near the town they're pretty easy, simply farther on they have higher levels. For now go east and once you lot're virtually the sea shore choose the northern peninsula. In the heart of the woods there is a hidden area: enter it at present. Hither you accept been with your sis before... At that place is no trace of Zerod and Bruk. But collect everything from the chests and go out. Past now, you lot probably have some monster corpses. Once you reach at to the lowest degree v of one blazon, y'all can requite them to the NPC next to the campfire to be rewarded with gilded and feel. Now choose the southern peninsula. Here you will observe the Flintwood Grove. There y'all can notice chests simply, and then after claiming all the loot from them you lot can return to the town.
Old Flintwood Mines
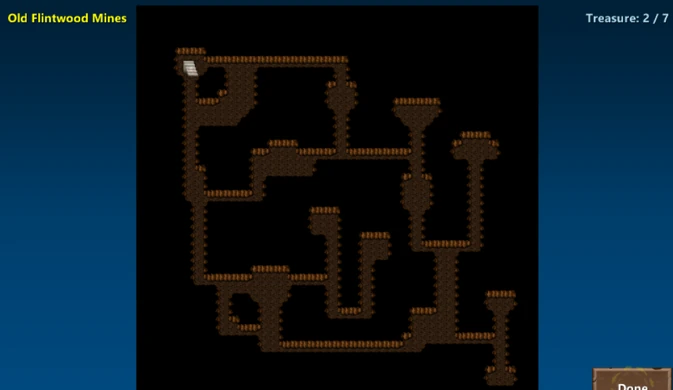
Enemies:
- Blue Fur Bat
- Spider
- Hornet
Walk direct north from boondocks. You will shortly find a cave archway in the mountains. Walk towards it to enter. You are in the Onetime Flintwood Mines. There are some red chests that refill every time you enter the area. Go through them all, and render here as many times every bit you need to reach level 3.
In 1 of the chests in the mine you can find a Holy Symbol. You can apply this detail to revive a dead party member. However, note that with the exception of spells books for the Cleric/Templar, you lot CANNOT Buy revive items! Holy symbols and revival scrolls will but announced in chests or, very rarely, equally monster drops. Use them advisedly.
Path to Briston
Enemies:
- Hornet
- Diameter Beetle
- Poisonous Lizard
- Charred Raven
- Black Spawn
Once you achieve level 3, visit the Flintwood Forest, where, just like in most of the groves, you lot can only detect chests. Eventually grind to level 4 in the OFM, if you don't have already it. And then go to the entrace to OFM (after preparing for jouney) and go due west. Then go s once you touch the mountains and as the path opens go eastward. Enter the town.
Briston
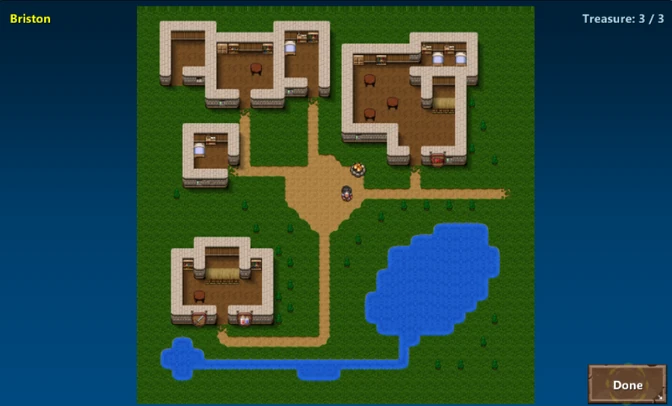
Town
You may have noticed that well-nigh Briston the enemies were style harder (level 6), but at level v you should have no issues killing them. Arm ameliorate in boondocks, save game, plough in monster corpses, do anything else you might and might non need, and leave the boondocks.
Grinding
Enemies:
- Black Spawn
- Charred Raven
- Goblin
- Wolf
For now, the thing you demand the near to progress in the game is the experience, every bit well as whatever augmentation gems. Go straight south-westward from town to Briston Forest. Collect the treasures and go out. Now, return to the town and gear up. You will take to grind to level 7, for now. And so cantankerous bridge south-east of Briston and go straight to the fork in the road. Choose the south path. Then become straight west to find a hidden area in the middle of the forest. This is the Briston Merchant army camp. Buy from him any items you may need and exit. At level vii-8 you lot can cross the bridge north-w from merchant. You volition encounter a forest patch. Enter the grove... You lot are in the Briston Grove now. Here enemies are harder than earlier the span. Don't worry however, at the level viii you lot should completly smash them. Grind here and n of here to level ix. So enter the cave that can be found n of the Briston Grove.
Cavern of the Creature
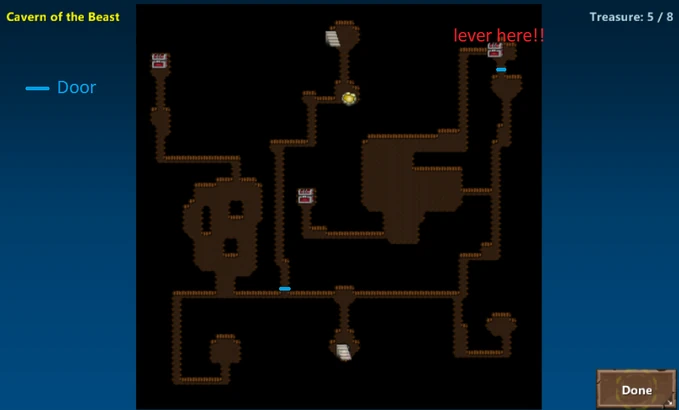
Enemies:
- Ratkin
- Half Orc
- Scorpikis
- Skeletal Warrior
- Boss: Gargoon
From the entrance, get n and take the first opening on your left. Then turn north again at the first unblocked passage to claim a treasure breast after a long path. Return to the mainway and go west again, and then south, then east, and then north. Now, merits a very rare item: Scryer'due south Parchment, and return to entrance - or just to the bespeak where yous start heading westward first - and go straight east from there. You're at a road fork again. Go south, east and northward for more treasures. Go back and caput due north. Take the first opening on your left, get south-west and so north when you enter a modest corridor for treasure. So return to the big chamber and head north, in one case y'all touch the wall go east and follow the corridor until the end. Take whatsoever treasures and the key and then pull the lever. Go due south and then take the second opening on your left. Proceed to discover the airtight door you have seen on the brainstorm. Open them with your key. Follow the corridor behind them until a yellowish healing puddle. Residue and salve game there, if you are at level x vitrify your party, and fight Gargoon who is blocking your manner forward.
One time you vanquish him, take the unique Gem of Flicker and any treasure from him, and leave for Hills of Keramore through the stairwell in his room.
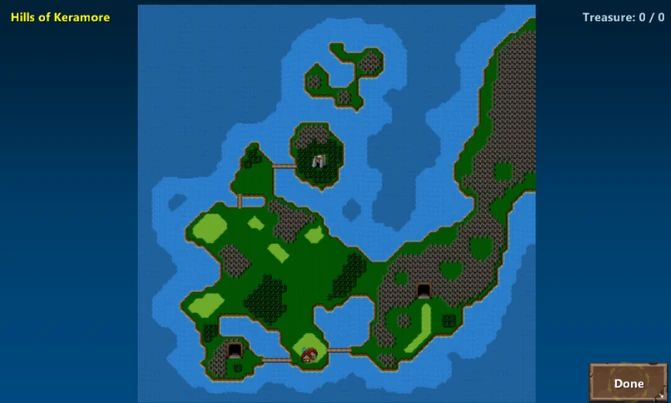
Hills of Keramore
Keramore
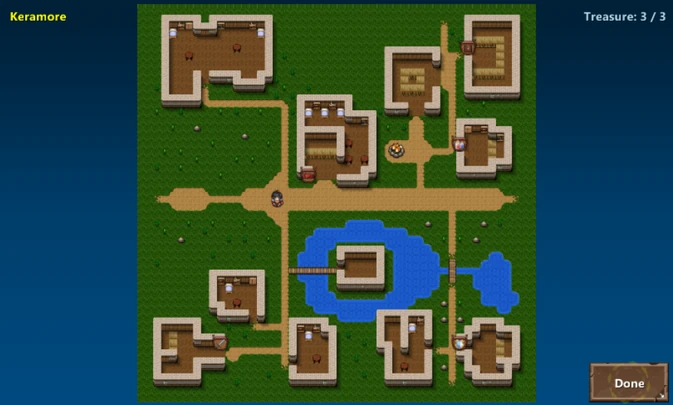
Afterwards leaving Cave of the Beast you will spawn at Hills of Keramore. Get south, so e, then cantankerous the bridge and enter town.
Town
If you have such coin arm yourself amend, and subsequently saving game and taking spirit vitrify leave town.
Grinding & Groves
Enemies:
Bluewing (eleven LVL)
Vulture (12 LVL)
Thornburst (thirteen LVL)
Dark Elf (14 LVL)
At present, one time you reach 12 level (grinding in Cavern of the Animal or nearly Keramore) y'all can visit Keramore Grove and at 13 Keramore Forest. After that don't buy any items at Keramore - they're cheaper at Keramore Merchant Camp. At 14-15 you can, after visit in Keramore Woods enter Dwarven Catacomb.
Dwarven Crypt
B i
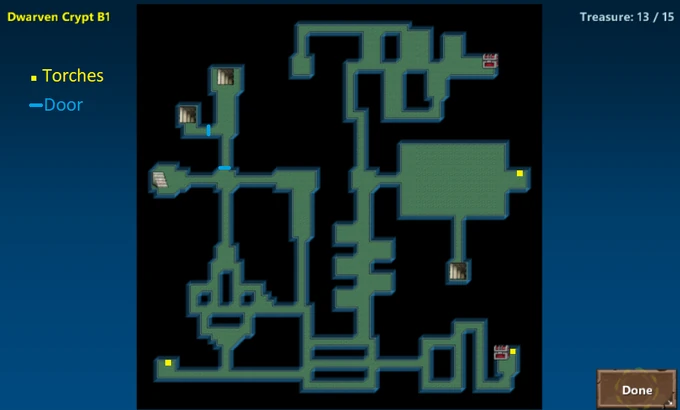
Enemies:
Nighttime Elf (14 LVL)
Drider (15 LVL)
Dark Elf Priest (16 LVL)
Nighttime Terror (17 LVL)
Os Golem (xviii LVL)
Get east to light. North of that y'all should see locked door. This leads to boss. This will open after you lite all the torches in B1. Lets get and calorie-free torches! - you might say. This is not easy. Firstly, caverns are large. Secondly, they are filled with monsters, sometimes as well powerful to fight, sometimes even ambushing you, not giving time to flee and cracking. If they kill you lot it's even always not worth of reloading last save. Nonetheless, save often, because there are bugs than delete save state sometimes. If you can, fill-in to cloud before every exiting of game. Next time you enter there may be update making you unable to play online. Subsequently update, considering of bug at Marketplace you may be unable to enter game and forced to reinstall which delete local saves. Wait as well here.
Afterwards you lot're sure you prepared yourself.
Go south. When touch on to wall, go two steps due west, and then over again south and once bear upon to wall over again two steps west and again south. So few steps east and have corridor opening at the south. Turn west, go to chests and light starting time torch. Become over again e and to second torch. Light torch and get light another.(supplant notation after locating torchs) After lighting all torches teleport out and enter once again. That door at the begin should exist opened now. Get through this and along corrindor backside to staircase. Descent to Dwarven Crypt B2.
B ii
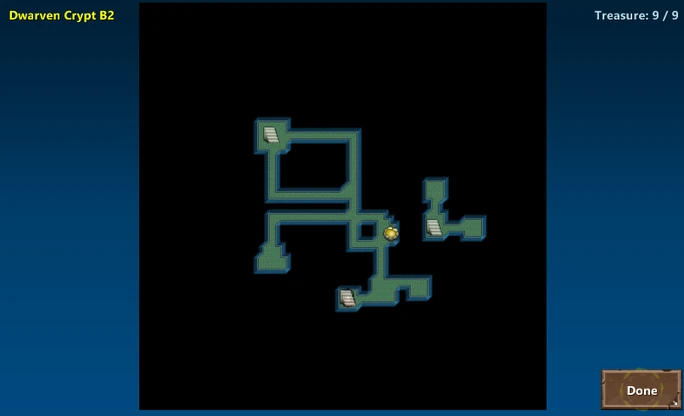
Enemies:
Dark Elf Priest (16 LVL)
Dark Terror (17 LVL)
Bone Golem (eighteen LVL)
Boss:
Azeris the Blackened (18 LVL)
Caput east, then due south and take first opening at your left. Follow the corridor to the chests. Open up them and return to where y'all start heading west. Caput east and then due south to Healing Pool. Residual and save game. Grind to level 18. And then you lot will exist able to fight Azeris. Once y'all impale him, take whatsoever treasures from earlier him and Dwarven Barell. Then head to get out in his bedroom. Once you find yourself again in B1 pull lever and get out.
Way to Blackfire Valley
Preparation
Enemies:
Stone Moth (19 LVL)
Blackwing (20 LVL)
Behemothic Mantis (20 LVL)
Once you return to Keramore, do any needed preparations and exit town. Head east. Employ Dwarven Barell at stone blocking your fashion. Grind there to 19. And so, later visiting Keramore Passage Forest enter cave north-w of it.
Mount Kera Tunnel
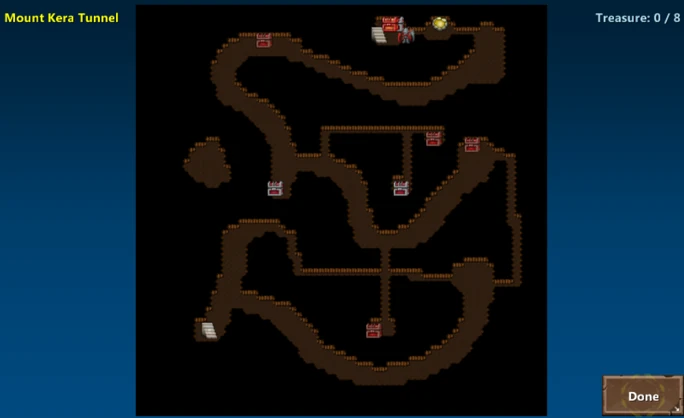
Enemies:
Rock Moth (xix LVL)
Blackwing (20 LVL)
Behemothic Mantis (twenty LVL)
Dominate:
Bonesnapper (20 LVL)
The map is articulate, then I won't write speciefied direcrections. Just collect all treasures and if y'all already don't have 20 level teleport out and reenter. Grind to 20 and then talk to Bonesnapper. In one case you lot beat him collect any treasures and leave.
Blackfire Valley
Overworld
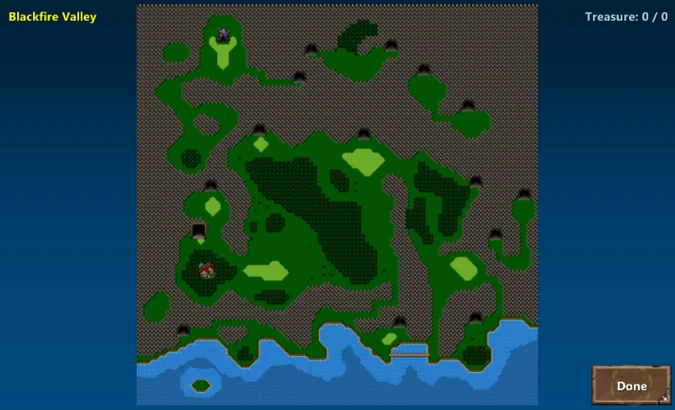
MapEnemies
- Wild Zoorii (LVL21)
- Goblin Thug (LVL22)
- Flesh Eater (LVL23)
- Lizard Brute (LVL24)
- Bandit (LVL25)
- Fauna of Granite (LVL26)
- Mountain Orc (LVL27)
- Shrieker (LVL28)
- Blackfire Archer (LVL29)
You are at Blackfire Valley. Go south to town. Enter it.
Shadowdale
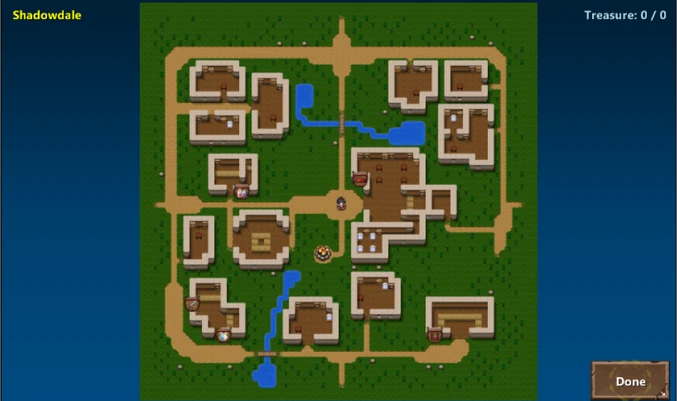
Take intendance any preparations and enter stairwell next to the INN. Y'all are on Shadowdale Arena. If yous accept such gems buy anything y'all want and, if yous want refight any bosses at the south. Leave then. Accept regular prepares, buy something if you tin and want and exit town.
Blackfire Mountain
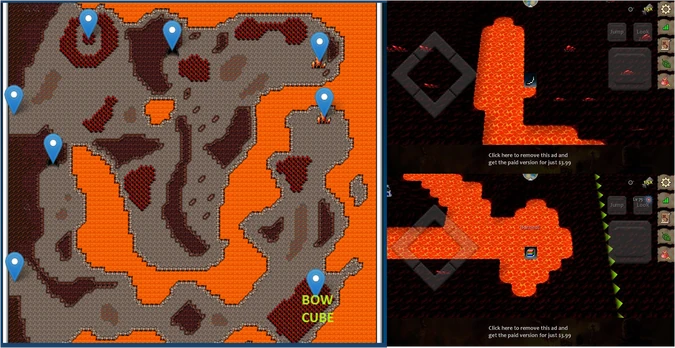
At map there are marked many cave entraces. They all lead here, to Blackfire Mountain cave organization.
Map

Enemies
- Wild Zoorii (LVL21)
- Goblin Thug (LVL22)
- Flesh Eater (LVL23)
- Lizard Brute (LVL24)
- Bandit (LVL25)
- Beast of Granite (LVL26)
- Mountain Orc (LVL27)
- Shrieker (LVL28)
- Blackfire Archer (LVL29)
Redfist Camp
Map
Enemies
- Flesh Eater (LVL23)
- Lizard Brute (LVL24)
- Bandit (LVL25)
Boss
- Yarlik the Cherry (LVL26)
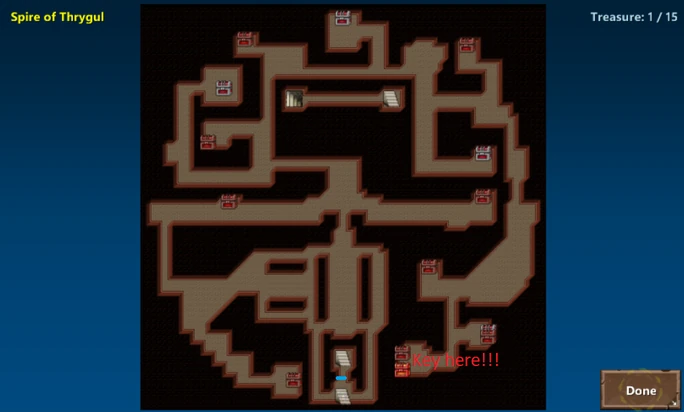
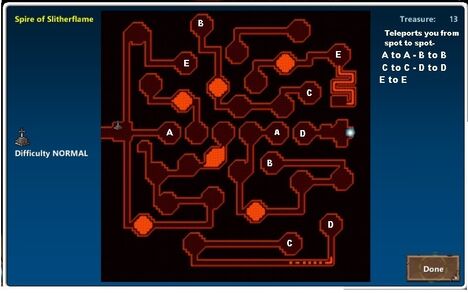
Spire of Thrygul
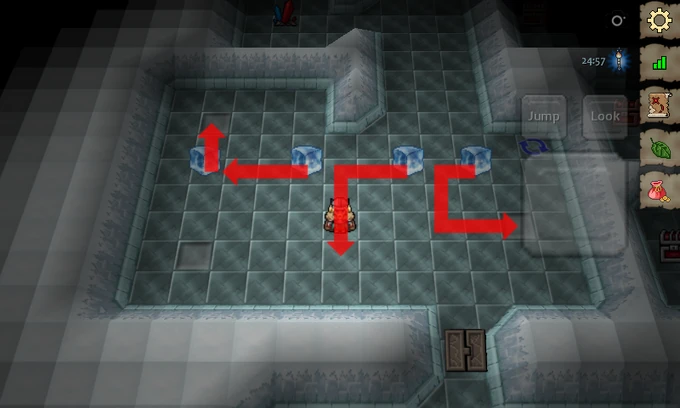
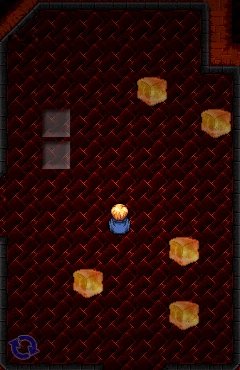
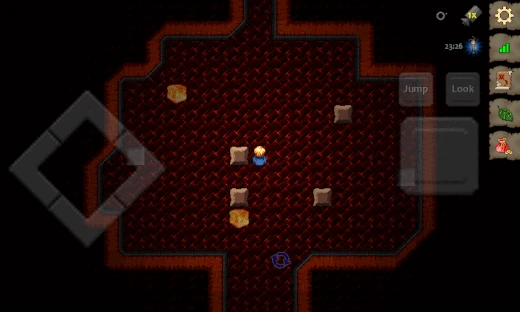
Map - F1
F2
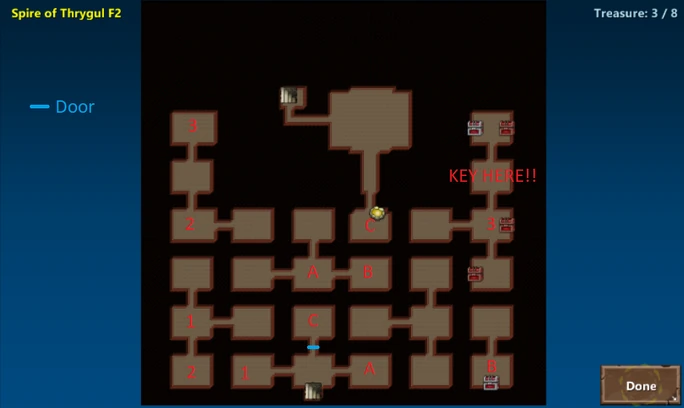
Enemies
- Blackfire Archer (LVL29)
- High Mage (LVL30)
- Minion of Thrygul (LVL30)
Dominate
- Thrygul (LVL30)
Razorfin Cove
Overworld
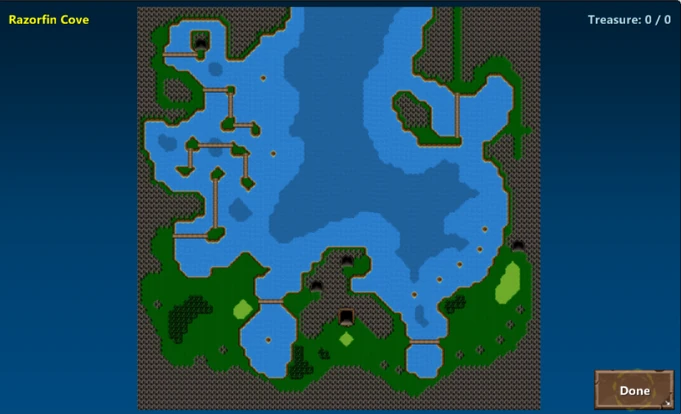
MapEnemies
- Rockfall Beast (LVL32)
- Stoneskin Drake (LVL33)
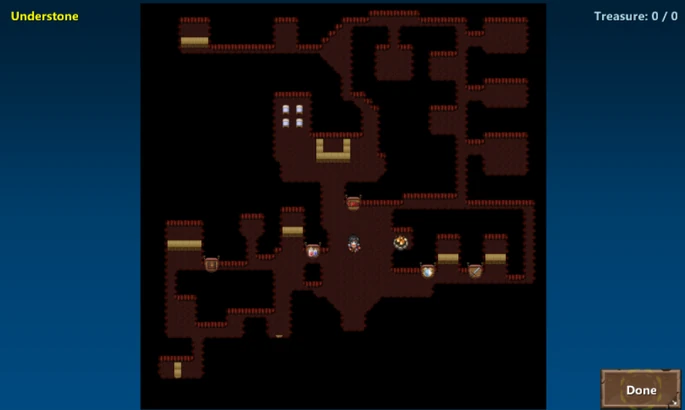
Understone
Razorfin Bog
Entrance
Leave Understone by stairwell between Items and Magic shop. Cantankerous the bridge and go west. Once you touch to the mountains caput due north. Take bridge opening at your correct. Follow the path to discover bog at the end.
MapEnemies
- Rockfall Animal (LVL32)
- Stoneskin Drake (LVL33)
- Guardian of the Bog (LVL34)
Merchant
At the map is marked hush-hush merchant. He sells many things cheaper than anywhere else.
Razorfin Shallows
MapEnemies
- Stoneskin Drake (LVL33)
- Guardian of the Bog (LVL34)
- Swamp Sprite (LVL35)
Boss
- Grum of the Swamp (LVL35)
Razorfin Lagoon
Map
Enemies
- Guardian of the Bog (LVL34)
- Swamp Sprite (LVL35)
- Encrusted Mimic (LVL36)
- Boss
- Zarchoomi (LVL36)
Razorfin Grotto
Map
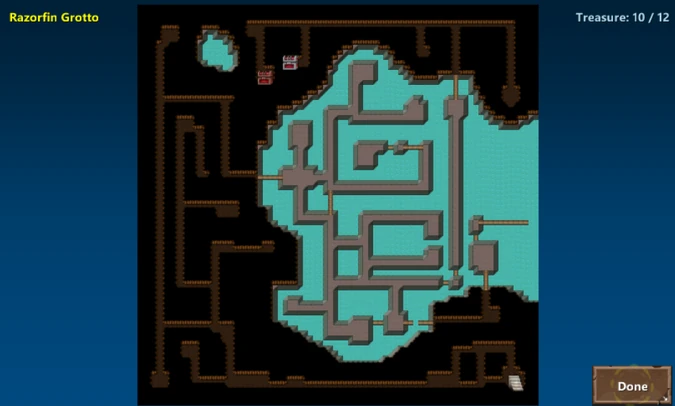
Enemies
- Swamp Sprite (LVL35)
- Encrusted Mimic (LVL36)
- Undead Pirate (LVL37)
- Grayfin (LVL38)
Dominate
- Rockfin (LVL38)
Reef of Razorfin
Map
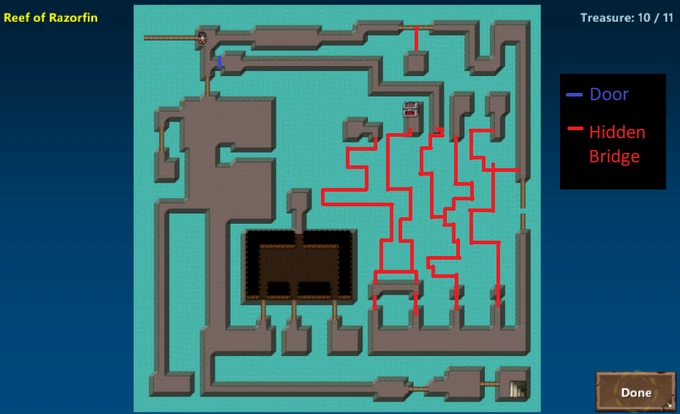
Enemies
- Grayfin (LVL38)
- Seaclops (LVL39)
- Clattering Helm (LVL40)
Boss
- FerDal the Hag (LVL40)
Descent of the Bloodgill
Map
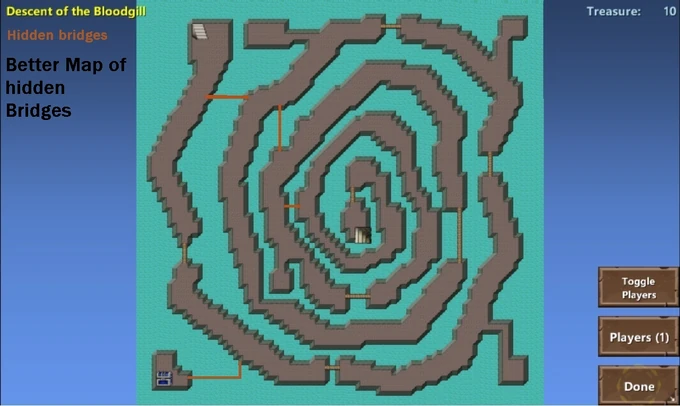
*Tip: four small lines are Subconscious paths (above map created by zDisAllowedOne)
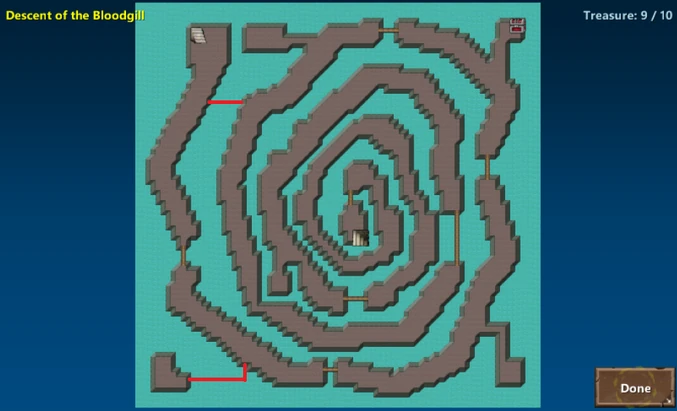
Enemies
- Clattering Captain (LVL40)
- Tiger Shark (LVL41)
- Undead Brute (LVL42)
Dominate
- Shellcrush (LVL42)
Bloodgill Go along
Map
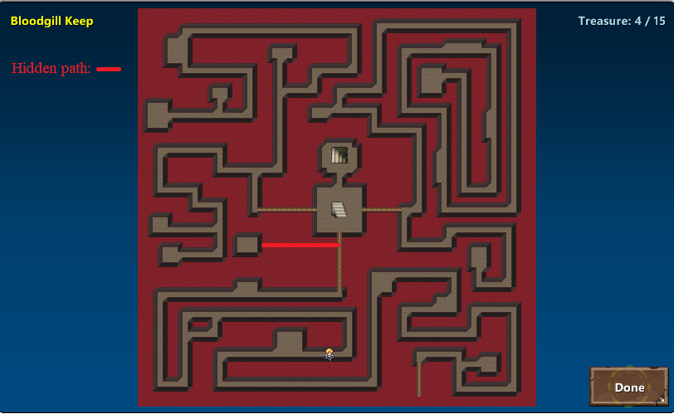
- Locate and rescue the dwarf. To find the dwarf, take the bridge just south of the staircase you came down from. Follow the path, it goes all the way to the Sanctum without branching off. After rescuing the dwarf, you should probably teleport to a town and save, because in that location are no salvage crystals Before any of the bosses in the Continue or Sanctum. All the crystals are located either (1) ane behind each boss, or (2) backside the locked door you lot have to open to get to the next area.
- Earlier taking on any of the bosses the first time, you should save at one of the crystals in Grotto/Reef/Descent, so when you die (nearly likely), you don't have to travel all the way from Understone again. Yous could, of course, use a Scryer's Parchment, but it is probably a waste material of a rare detail (although you lot can collect these easily in the Keramore Mines, after beating the boss in the next area).
- Defeat, in whatever society, the two bosses in the Keep (Hulcror, Bonefire) and Sanctum (Emeralsis, Haze), retrieve the keys, and employ them on the pillars by the locked door in the Go on. This will allow you lot to enter the adjacent area, Lair of the Kraken.
- Exiting the dungeon Volition crusade all the bosses to respawn, reset whatever agile pillars/close the door if opened, and whatever keys nonetheless in your inventory will be removed the adjacent time you reenter the dungeon.
- High-level rare items (☆☆☆) get-go dropping in the Keep (and Sanctum), making them best place to grind, until y'all tin get into the Lair. There is one respawning breast, in the Sanctum, but it only contains scrolls (and spell books?). Keep farming the respawning chest in Descent of the Bloodgill if you want more pieces of equipment.
Enemies
- Undead Brute (LVL42)
- Coral Golem (LVL44)
- Octofiend (LVL44)
- Bladebone Shark (LVL44)
Boss
- Hulcror (LVL44)
- Bonefire (LVL44)
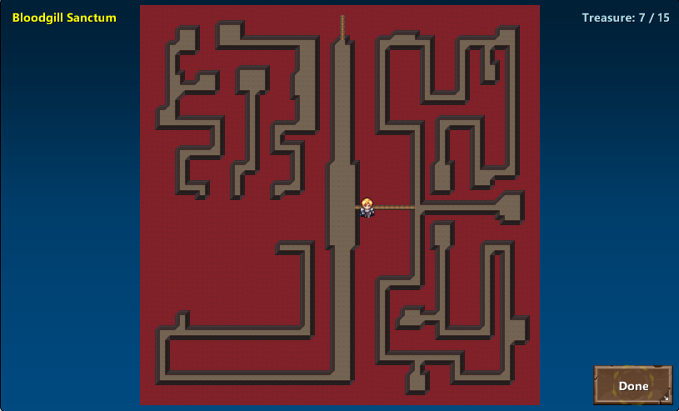
Bloodgill Sanctum
Map *Annotation: Pitiful because I very lazy for describe hidden path at this map. I volition update subsequently.
Enemies
- Undead Brute (LVL42)
- Coral Golem (LVL44)
- Octofiend (LVL44)
- Bladebone Shark (LVL44)
Dominate
- Emeralsis the Cleaver (LVL44)
- Haze the Fallen (LVL44)
Lair of the Kraken
Map
*Note: I don't remmenber exactly location of all torches. I will update later (>_< Sola)
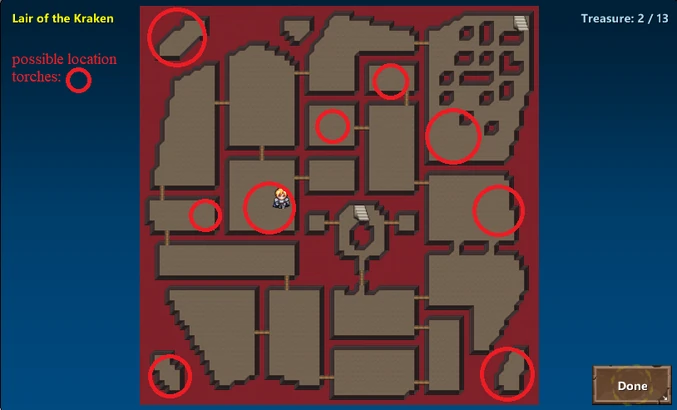
- You lot must light all 10 of the torches in order to open the door to the Kraken.
- This is the only map in the game where the rare item, Essence of Lesser Evil drops. Y'all tin combine this item with certain weapons to upgrade them.
. There are likewise many armor/accessories/items that do not drop elsewhere, making information technology one of the ii most important zones for farming (the other is the Level 44 Keramore Mines).NOTE: this data was only valid prior to the one.44 update.
Enemies
- Coral Golem (LVL44)
- Octofiend (LVL44)
- Bladebone Shark (LVL44)
- Raging Bloodgill (LVL45)
- Young Sea Dragon (LVL45)
- Sea Siren (LVL45)
Boss
- Krakken Vyku (LVL45)
Icy Lands
Frigid Shores

On the side of the raised surface area in the pinnacle of the center of the map, 1 tile looks visually different, allowing y'all to walk on top of it, and cantankerous the bridge continued to it.
Similar tiles are nowadays along the edges of superlative-changes, allowing you to travel between heights.
MapEnemies
- Arctic Burrower (LVL46)
- Kobold (LVL47)
- Gloom Firecaster (LVL48)
Wintry Merchant Military camp
Grove: Arcsith Forest
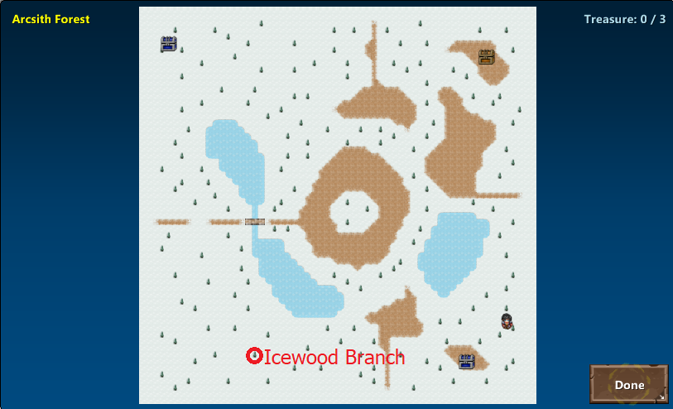
- Blue Chest: Glacial Jewel of Mana
- Blue Breast: Chill Wool Manus Wraps
- Chocolate-brown Chest: Glacial Potion of Healing
- Icewood Branch (encounter 'X' on the map)
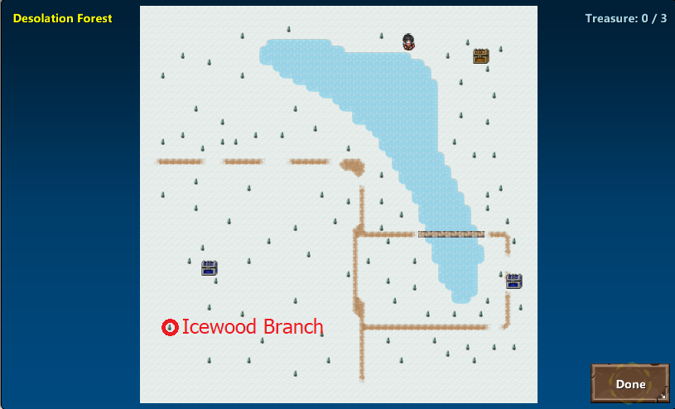
Grove: Wintry Woods
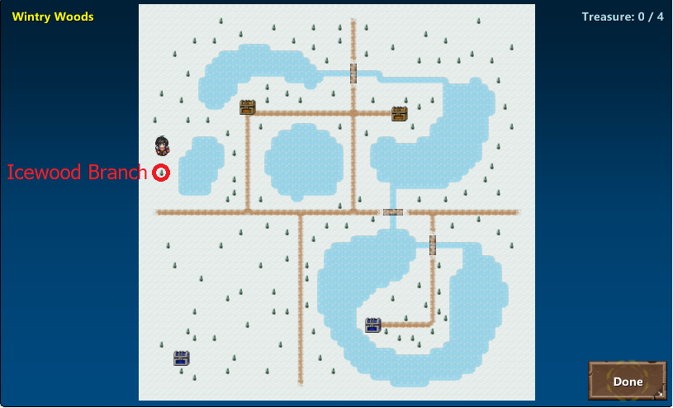
- Brownish Chest: Gelid Elixir
- Chocolate-brown Breast: Glacial Potion of Healing
- Blueish Breast: Glacial Gem of Endurance
- Blueish Chest: Cold Mithril Plated Gloves
- Icewood Branch (see '10' on the map)
Grove: Northshore Woods
- Brown Chest: Glacial Potion of Mana
- Blue Chest: Glacial Gem of Prowess
- Blue Chest: Mammoth Hide Boots
- Icewood Co-operative (see RED 'Ten' on the map)
- Simple Necklace (meet BLUE '10' on the map)
Arcsith
Map
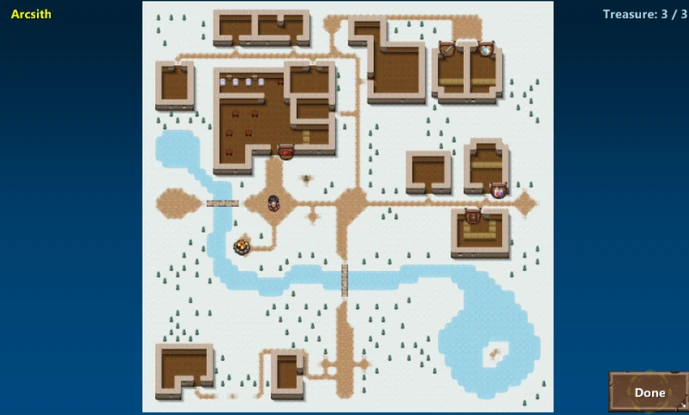
Treasure
- NOTE: Requires 1 Ornate Skeleton Central to access all chests
- Golden Chest: Blackice Longsword
- Blue Breast: Arctic Wool Trousers
- Icewood Branch (see 'X' on the map)
Quests
- NOTE: You practise non take to talk to any of the quest givers to start the quests (i.e. you can find Icewood branches before speaking to any NPCs)
- Corpse Enquiry
- Skeleton Central Enhancement:
Trade one Skeleton Key and 20000 gold for one Ornate Skeleton Key
TIP: You should turn your skeleton keys into ornate keys as soon every bit you can, and also open the door in Arcsith to the golden chest. The weapon inside is just ☆☆, so volition become a normal drop item later on. You will need a full of 6 ornate keys to open all the gold-trimmed wooden doors (including the one in Arcsith). Ii of the doors are in the Writhing Temple of Ice, and the last 3 in the Spire of Winter's Fury.
- Icewood Drove:
Collect viii Icewood branches, 1 of which is constitute in Arcsith itself (run into 'Ten' on the map). The other seven are found by checking the trees in groves. Reward: Icewood Wand of Arcsith ☆☆☆
- Lost Trinket:
Find a necklace an old man has lost. The necklace is in the eye of a small lake in the tiptop-left corner of the grove, Northshore Forest. Reward: Wintry Chugalug of Battle ☆☆
TIP: Highly recommended to consummate this quest as soon as you lot can, because the advantage item is not a very rare item, so volition become a normal drop item (uncommon) when yous accomplish Eastern Desolation and beyond (level 56+)
- Lost Remains:
Find the remains of a hunting party that was killed by a frost giant. The remains are side by side to the expanse boss in the Permafrost Catacombs, Frost Giant Frug. Reward: Band of the Cold Nighttime ☆☆☆
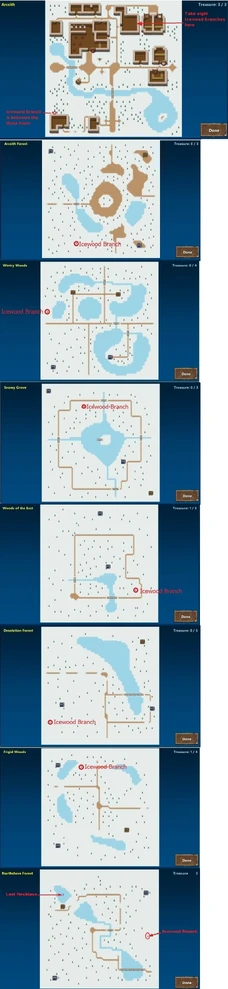
Locations of Icewood branches
These maps show where the Icewood branches volition be institute & where to take them.
Thank you to anybody that helped me.
Permafrost Catacombs
Map
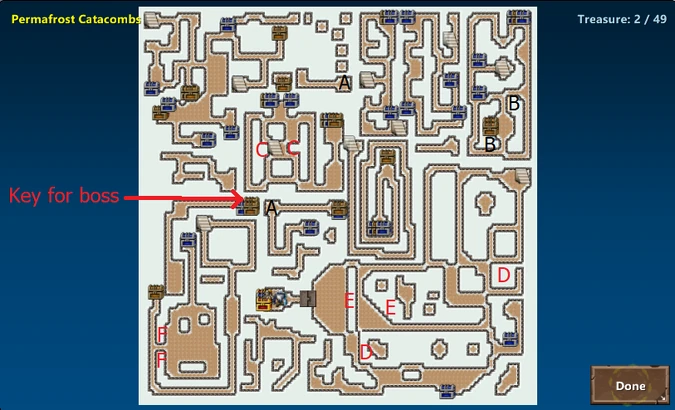
- Note: A,B,C... : is location of springboard. A to A, B to B, etc. (Sola)
Treasure
- Brown Chest (nineteen)
- Glacial Potion of Healing (7)
- Glacial Potion of Mana (7)
- Scryer's Parchment (2)
- Gelid Elixir (two)
- Cold Iron Key
- Blueish Chest (28)
- Glacial Precious stone of Power, Nimbleness, Intensity, Knowledge, Prowess
- Frozen Jewel of Power, Nimbleness, Intensity, the Stout, Vigor, Mana, Force, the Crusader, Magic
- 19000g
- Mammoth Hide (Full Set)
- Cold Mithril Helmet, Shoulderguards
- MIthril Ringmail Chain Faceguard, Vambraces, Leggings
- Arctic Wool Robe
- Winter's Rose
- Glacial Gild
- Golden Breast: Frost Giant Eye of Nimbleness
- Aureate Chest: Frost Giant Eye of Endurance
- Quest Item: Hunting Party Remains
Enemies
- Depending upon whether yous enter the catacombs from The Frozen Tundra or Eastern Desolation, the enemies you encounter volition differ (generally the same monsters you encounter in the outside expanse also appear inside).
- Gloom Firecaster (LVL48)
- Wintry Goblin (LVL50)
- Frozen Treant (LVL51)
- Icy Terror (LVL52)
- Young Icebeast (LVL56)
- Yeti (LVL56)
- Gelid Drake (LVL56)
Boss
- Frost Giant Frug (LVL57)
The Frozen Tundra
Map
- The beginning dungeon, Writhing Temple of Ice is hands accessible from the Frigid Shores. You should endeavor the dungeon when you reach level 54. Defeat the dungeon dominate to disable one of the magical barriers that blocks the path to the Temple of Mystaria.
- There is but one grove in this zone, to achieve information technology you have to first follow the path using the steps (marked by ruby icons on the map) from the Frigid Shores, then again in the Frozen Tundra. Visit the grove if yous want to complete the Icewood Drove quest.
- The second dungeon, Spire of Winter'south Fury, is simply attainable from the next zone. To reach the side by side zone, use the cave entrance at the far right of the map.
- The other cave entrances in this area just pb to non-essential chests.
Enemies
- Wintry Goblin (LVL50)
- Frozen Treant (LVL51)
- Icy Terror (LVL52)
Grove: Snowy Grove
- Brown Chest: Glacial Potion of Healing
- Blue Chest: Frozen Jewel of Power
- Blue Chest: Arctic Wool Sleeves
- Icewood Branch (see 'Ten' on the map)
Writhing Temple of Ice
Map
| Block Puzzle |
 |
Treasure
- NOTE: Requires at least one Ornate Skeleton Key to access all chests (full 2 keys to open all the doors)
- Red Breast (3)
- Ruby/Silver Breast (2)
- Golden Breast: Frost Behemothic Eye of Intensity
Map F2
| Cake Puzzle |
 |
Treasure
- Ruby-red Chest (8)
- Red/Silver Chest (iv)
- Orange Breast (1)
- Dominate Stash: Hardened Ice Crystal
Enemies
- Snow Badger (LVL54)
- Water ice Golem (LVL54)
- Gloom Elf Magician (LVL54)
Boss
- Jeru Cragfang (LVL54)
Eastern Desolation
Map
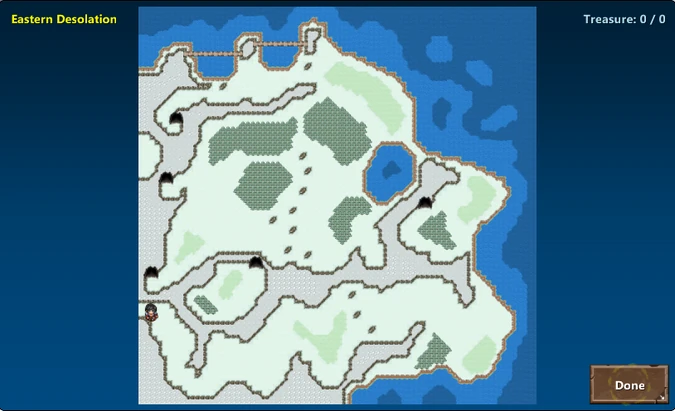
- To attain the 2nd dungeon (which is actually on the map in the previous zone), follow the path across the bridges at the top of the map.
- There are 3 groves in this zone. Ane is accessible on the way to the second dungeon, the other two are at the lower side of the map, and crave you lot to utilize the non-cave path from The Frozen Tundra (using the steps marked with red icons on the map above). Visit the groves if you lot want to complete the Icewood Drove quest.
- The upper two cave entrances just lead to not-essential chests
- The optional zone dominate in the cave system, Permafrost Catacombs, can exist reached past taking the cavern entrance at the far right of the map, But to open the door in front end of the boss, you need a key which is some other cave department -- starting time enter the cavern section in the middle of the map and collect the Cold Atomic number 26 Key.
Enemies
- Young Icebeast (LVL56)
- Yeti (LVL56)
- Gelid Drake (LVL56)
Grove: Woods of the Eastward

- Brown Chest: Gelid Elixir
- Blue Chest: Frozen Dagger
- Blueish Breast: Frozen Jewel of Prowess
- Icewood Branch (see '10' on the map)
Grove: Pathos Forest
- Brown Chest: Glacial Potion of Mana
- Blue Breast: Frozen Gem of Power
- Bluish Chest: Frozen Gem of Knowledge
- Icewood Branch (run into 'X' on the map)
Grove: Frigid Forest
- Chocolate-brown Chest: Pledge of Heroes
- Brown Breast: Scryer's Parchment
- Bluish Chest: Frozen Jewel of the Noble
- Blue Breast: Frozen Precious stone of the Crusader
- Icewood Co-operative (see '10' on the map)
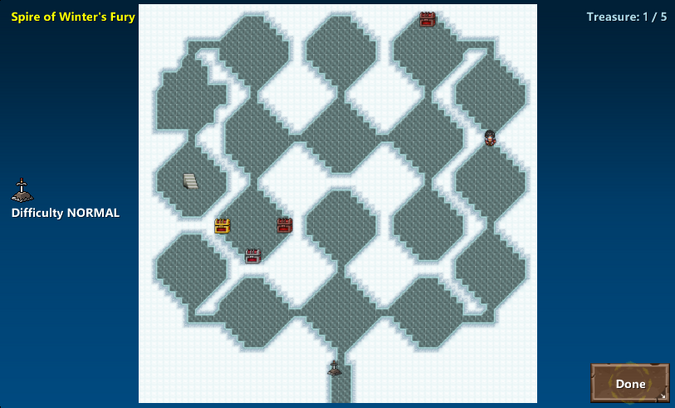
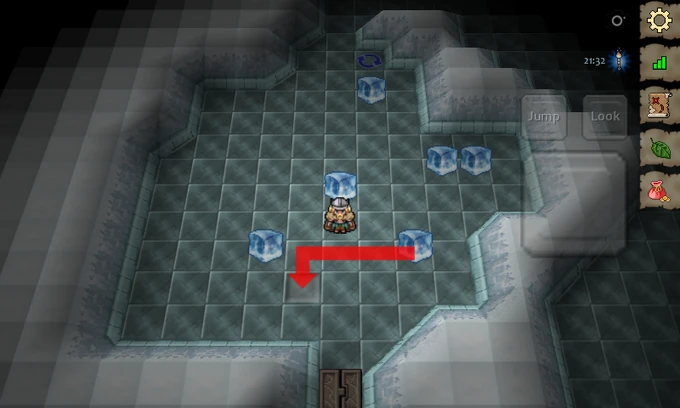
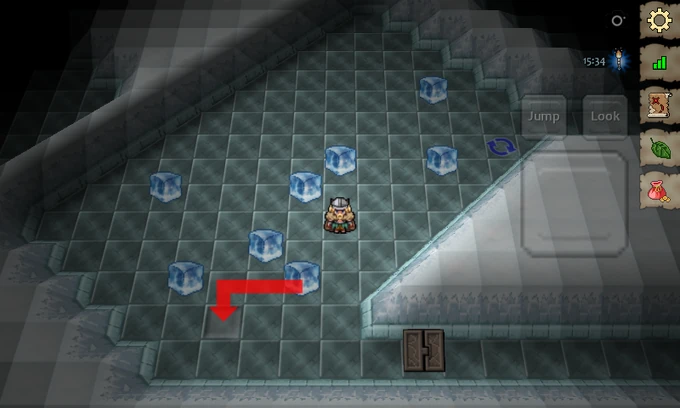
Spire of Winter'due south Fury
Map
| Cake Puzzle |
 |
Treasure
- Notation: Requires i Ornate Skeleton Key to admission all chests
- Red Breast (3)
- Ruddy/Argent Chest (ane)Preview
- Golden Chest: Chilling Idol of Sorrow
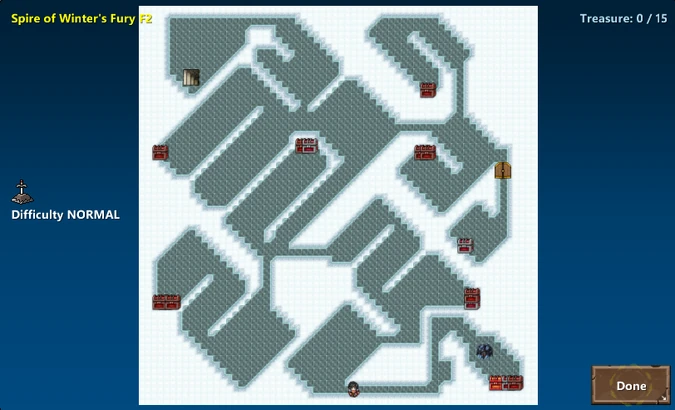
Map F2
| Cake Puzzle |
 |
Treasure
- NOTE: Requires 2 Ornate Skeleton Keys to access all chests
- Red Chest (10)
- Red/Silvery Chest (4)
- Orangish Chest (1)
- Boss Stash: Snowbeast Center
Enemies
- Gloom Barbarian (LVL58)
- Frost Siren (LVL58)
- Fluttering Serpent (LVL58)
Boss
- Yorg the Snowbeast (LVL58)
Temple of Mystaria
Map
- NOTE: At that place is no map/compass for this zone.
- When yous first enter the temple, everything will be covered in ice, and NPCs are frozen. Every bit you walk further in, you will encounter an NPC (actually the last boss of this section), who teleports you to the last dungeon.
- After defeating the dominate and completing the next dungeon, upon returning to the temple everything will have returned to normal. You can speak to several NPCs and visit several shops that upgrade your items using gems and gold. At the back (height) of the temple there are iii teleporters, one which lets you lot return to the last dungeon. The other two are unusable as of version 1.64 of the game, as it is the finish of the current content.
Shops
- In that location are 3 shops in the temple that will exchange your gems (scout/adventure/pvp/raid) and gilt to craft new or upgrade existing items.
- Weapon Shop
- Armor Shop
- Gem Shop
Icy Rift of the Witch
Map

- There are two teleporters on this map. The one on the far correct returns you the Frigid Shores. The i at the top of the map, leads to the next section of the dungeon. To reach that teleporter, follow the hidden teleporters that are indicated on the map higher up.
- TIP: As this dungeon is easily attainable, it is a expert place to grind for items by farming the ruddy chests.
- TIP: If you lot are strong enough, turn upward the difficulty to Hard and grind (make sure you don't accidentally change the setting to NIGHTMARE). Tier Three spells books volition drop fairly often, and the rate for rare drops is increased, too. The Rift is the simply zone where 3-star rare weapons drop. If battles are giving you trouble on HARD, one method you can try is to grind in the Spire of Winter's Fury (as well on Hard/NIGHTMARE setting), and endeavour to collect tier Iii books for Charm/Mute spells (both are level 56 spell books). Once y'all take them, you lot tin can charm the Ravagers/Guards and silence the magic users, making grinding in the RIft quite a chip easier.
Treasure
- Red Breast (6)
- Red/Silver Chest (1)
- Bluish Breast: Crystalline Water ice Shard
Map F2
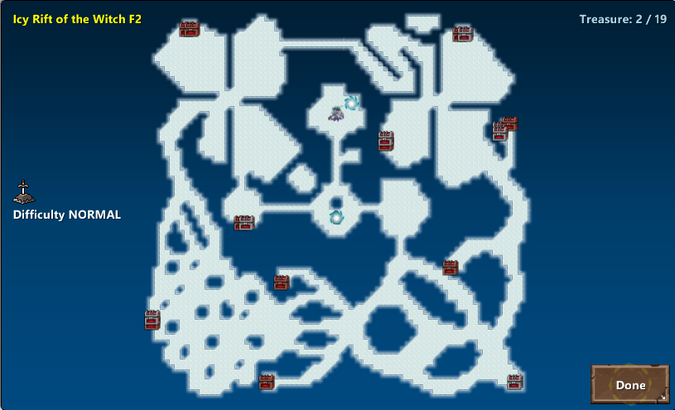
- The path to the left when you outset enter this section is blocked by puzzle blocks, and so first complete the puzzle from the right path, then move counter-clockwise effectually the map. Your goal now is to achieve those blocks you outset saw blocking the left path from the other side. Move one of the blocks up or downwards, and so movement the second block to the correct. Follow the block, then push it up so it slides onto the slot the unlocks the door to the dominate. There is too a Save Crystal you tin actuate right before the dominate battle.
- During your boxing with Zelia the Icy Witch, after you lot deplete most a quarter of her HP, Jeru Cragfang will join her. After you lot deplete about half of her HP, Yorg the Snowbeast will bring together her. so at ane betoken, you may be fighting all 3 bosses.
- TIP: There are Four red/silver chests on this floor (v, including the one past the boss). If you lot can put up with the potent enemies here or don't listen using repels like there is no tomorrow, it is an first-class place for farming not/semi-rare items. Farming the orange chest here is non as recommended as the ones in the ii tower dungeons, considering the bosses there will be very easy to defeat by the fourth dimension you tin complete this dungeon.
Treasure
- Red Breast (9)
- Red/Argent Breast (6)
- Orange Chest (i)
- Boss Stash: Zelia's Wand of Winter
- Boss Stash: Yorg'south Fang
Enemies
- Ice Rift Guard (LVL60)
- Heed Bender (LVL60)
- Ice Wyrm (LVL60)
- Rift Ravager (LVL60)
Boss
- Zelia the Icy Witch (LVL60)
- Jeru Cragfang (LVL60)
- Yorg the Snowbeast (LVL60)
Cadaverous Empire
Mystarian Ashen Outpost
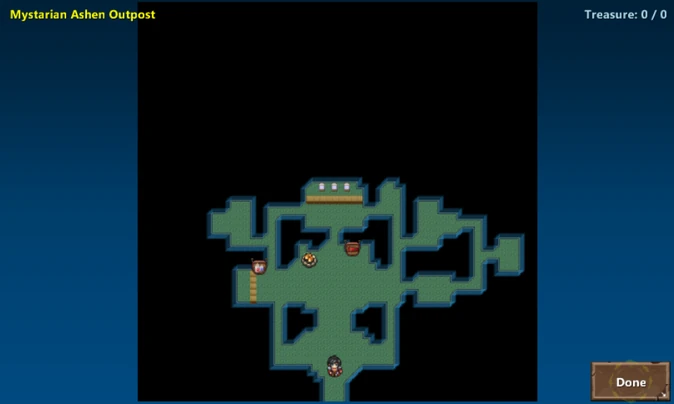
Welcome to Mystarian Ashen Outpost!
Initially, you will demand save the game in Arcsith (or use a Scryer`s Parchment) considering this outpost does not have any Npc`s. There is a quest where yous where yous will find and complimentary the NPCs.
Side quest:
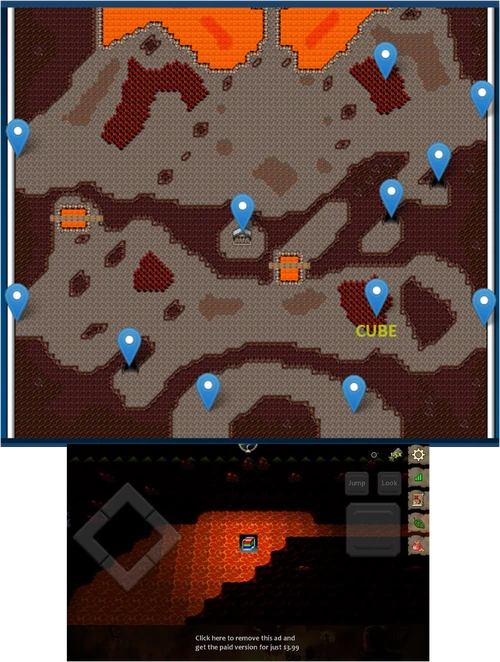
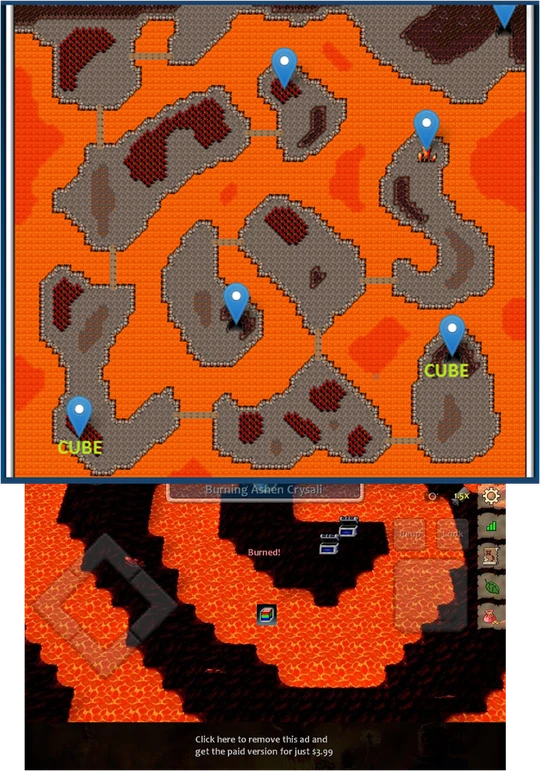
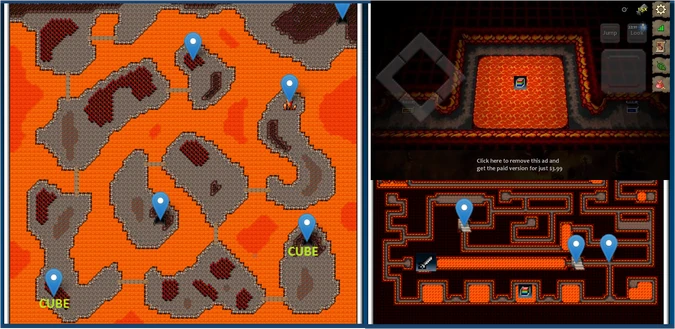
- Cube Collection: You tin find some Cubes (full 12 ?) and molds (total iii ?) in lava in the dungeons and trees in the secret forest to trade weapon ☆☆☆ and shield ☆☆☆
- Salve NPC: You will find the outpost NPCs in the various Dungeons (they are the Soul of Burn and can move around on the map) . (I take pivot all npc in map but i dont know what him/her tin do in outpost.)Tip: click on map to run across pin of npc you can click on it to view description.
Adjacent, go to map Ashen Empire (AE).
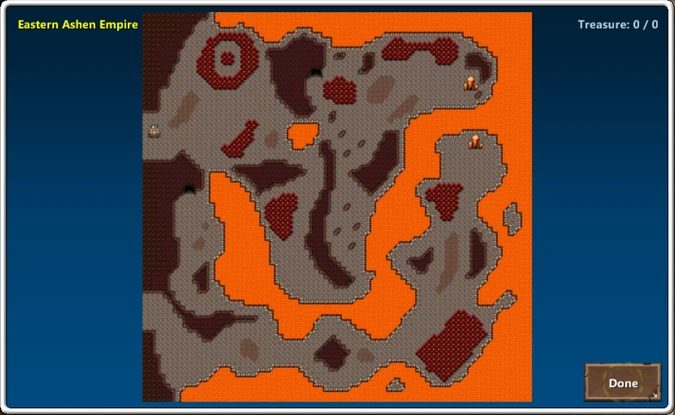
Ashen Empire
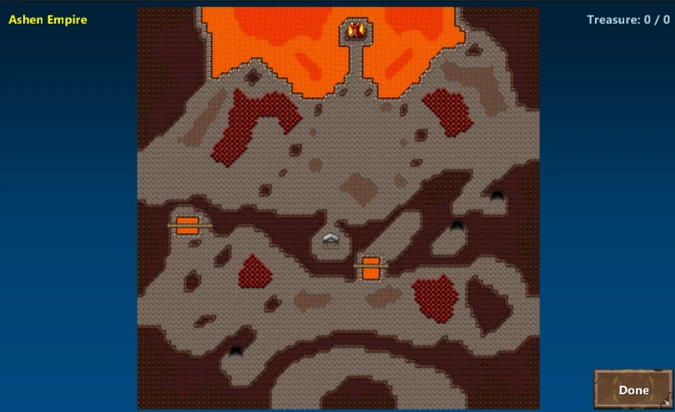
Map Enemies
- Stonefire Goblin (LVL63)
- Molten Calamity (LVL63)
- Banished Soul (LVL63)
Tip:
- You should train your party up to LVL 62 or college(if I were you,I will train upwardly to LVL 64) because you lot may have difficulty in adjacent dungeon.
- You can detect the secret grove (Name: North Cadaverous Crysali) in the woods in the upper right.
Next, you get to Western Ashen Empire (enter on the Left side). Don`t go to the cave or right side (Eastern Cadaverous Empire) yet.
Northward Ashen Crysali
Ashen Crysali
Western Ashen Empire
Map
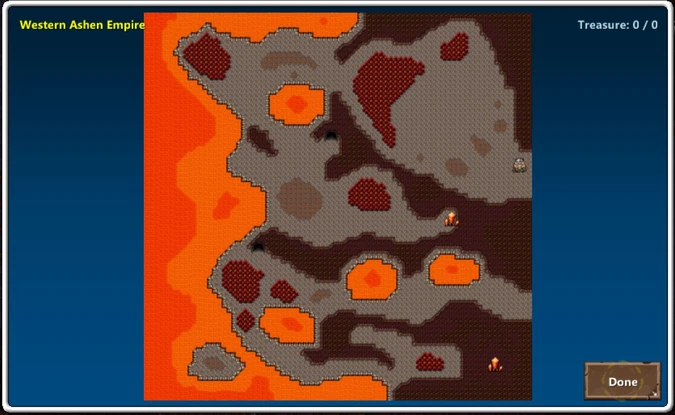
Enemies:
- Stonefire Goblin (LVL63)
- Molten Cataclysm (LVL63)
- Banished Soul (LVL63)
Tip:
- You will find a surreptitious grove (Proper name: W Ashen Crysali) in the north-western wood. Train your political party upwardly to LVL 64 or higher.
West Cadaverous Crysali
Map
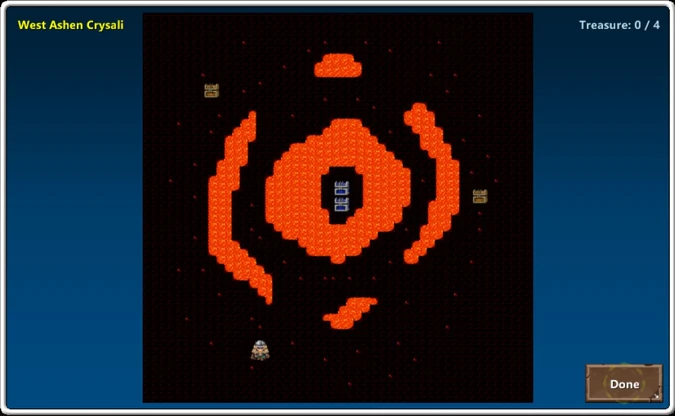
Enemies:
Once you take looted all the chests, head to the Molten Caverns (cave entrance in the upper middle of the map).
Molten Caverns
Map
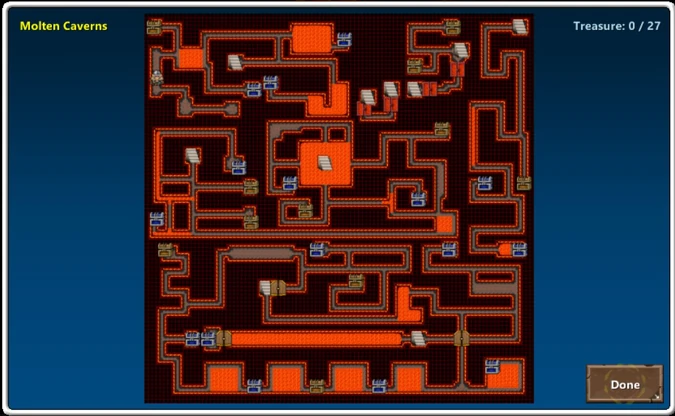
Enemies:
Tip:
- Molten Caverns like to Permafrost Catacombs(Arcsith). You access different parts of information technology thru different entrances.
- Here yous tin find the first NPC in here (Click map to see him/her )(location of NPC in map tin't exactly but I definitely take one NPC in here T_T)
Next, caput to Demonreach (y'all will meet it in map, it is the first Scarlet Castle in Westerns Cadaverous Empire)
Demonreach
Notation: This is a dynamic dungeon and will reset every time you go out and come back. there are two puzzles to solve to be able to accomplish all parts of the dungeon.
Map
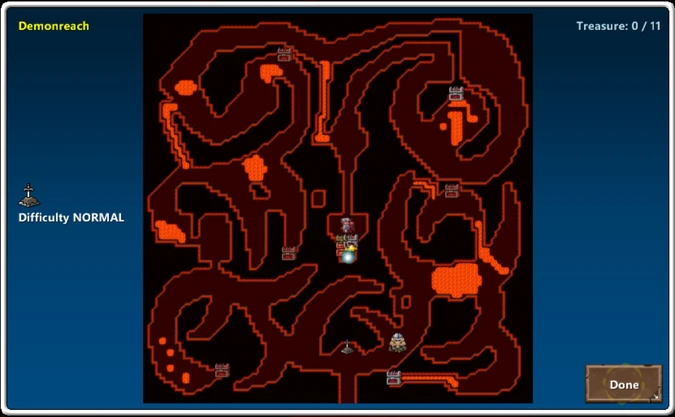
Enemies:
- Molten Calamity (LVL63)
- Stonefire Shaman (LVL64)
- Smoldering Rockhound (LVL65)
- Lava Drake (LVL65)
- Dominate: ????
Tip:
- You should exist at LVL 64 or higher when enter in Demonreach considering the monsters in here are LVL 63-65.
- During Demonreach yous tin detect one cube and three NPC`s (view map). Carefully! you can move on lava but lava will burn down your HP every steps on lava. TIP: yous can jump on lava to reduce the total number of steps your.
- Afterward you find all items and NPCs, head to the Boss room and defeat him (Call back to save before you battle with boss. In that location is a Save Crystal you can activate just before the boss room).
- Side by side, get to Mystarian Cadaverous Outpost. you should now exist able to save (inn keeper NPC should be there) and buy items from the general store provided you saved the all the NPC`south.
Demonreach puzzle
Next, go to Eastern Ashen Empire (enter on the right side).
Eastern Cadaverous Empire
Map
Enemies:
- Lava Drake (LVL65)
- Smoldering Rockhoud (LVL65)
- Firetongue Cadger (LVL66)
Tip:
- There is a surreptitious Grove in the the centre of the northwestern wood (Name: East Cadaverous Crysali) and you should have your political party at LVL 65 or higher.
- Yous will find a part of Molten Caverns (cavern archway in the upper center part of the map).
East Ashen Crysali
Map
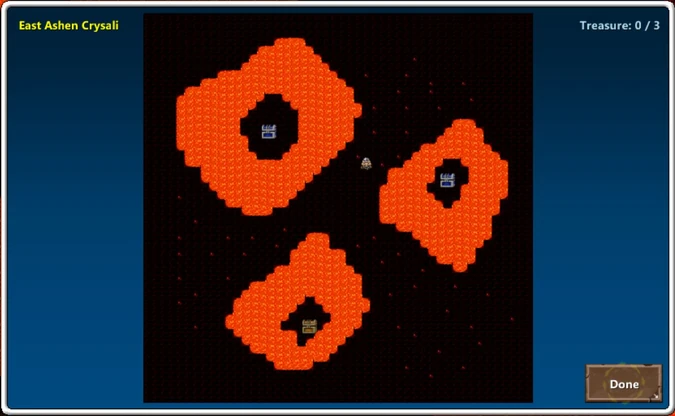
Enemies:
- Lava Drake (LVL65)
- Smoldering Rockhoud (LVL65)
- Firetongue Lizard (LVL66)
Molten Caverns
Enemies:
- Lava Drake (LVL65)
- Smoldering Rockhoud (LVL65)
- Firetongue Lizard (LVL66)
- Infernal Magma (LVL71)
- Skittering Horror (LVL70)
Rise of the Archfiend
Map
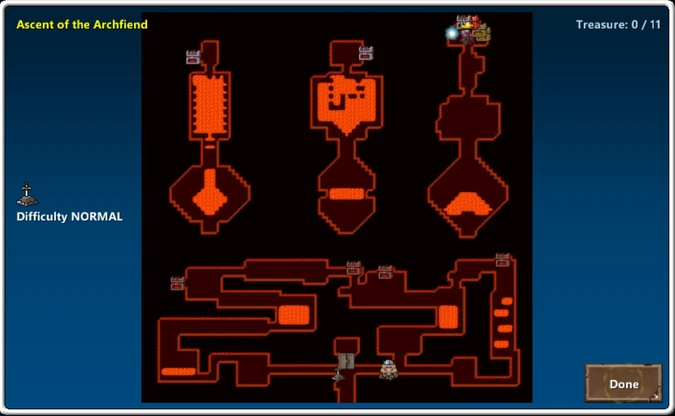
Enemies:
- Smoldering Rockhound (LVL65)
- Lava Drake (LVL65)
- Firetongue Lizard (LVL66)
- Spirit of Burn down (LVL67)
- Green Dragon (LVL67)
- Boss:Archfiend Iselis (LVL67)
Rising of the Archfiend puzzle
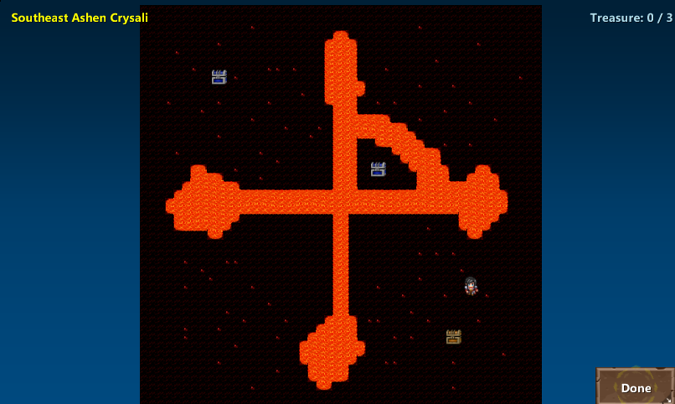
Southeast Ashen Crysali
Map
Enemies
Fortress of Grendel
Located at southern role of Western Ashen Empire. The Spirit flame for forging the cubes is in the top left tunnel of the Fortress of Grendel, at the very stop past all the lava.
Map
<Add map here/>
Enemies
- Green Dragon (LVL67)
- Spirit of Fire (LVL67)
- Charred Mummy (LVL68)
Fortress of Grendel puzzle
A shorter solution to this puzzle with instructions. http://postimg.org/image/my635f501/
Spire of Slitherflame
Located at southern part of Eastern Ashen Empire.
Map
<Add map here/>

Enemies
- Ember Basalisk (LVL69)
- Inferno Golem (LVL69)
- Skittering Horror (LVL70)
- Infernal Magma (LVL71)
- Pyreknight (LVL71)
Southern Ashen Empire
Accessible throught Molten Caverns in Eastern Ashen Empire.
Map
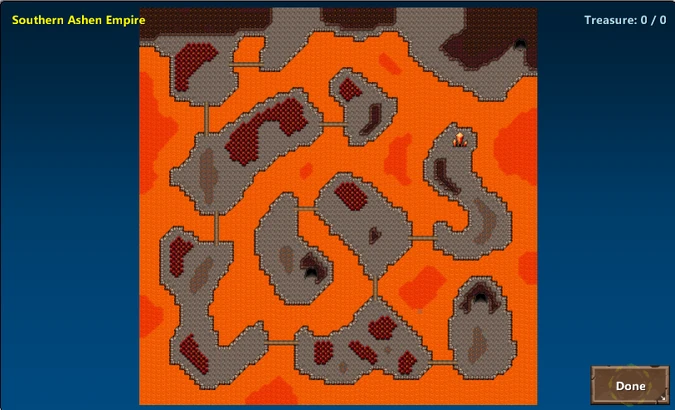
Enemies
South Ashen Crysali
Map
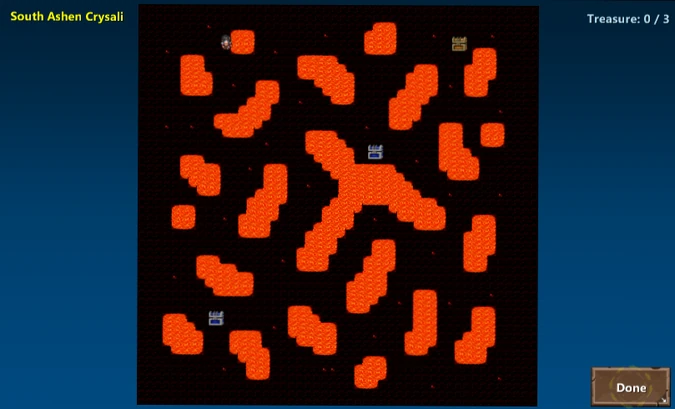
Enemies
Burning Ashen Crysali
Map
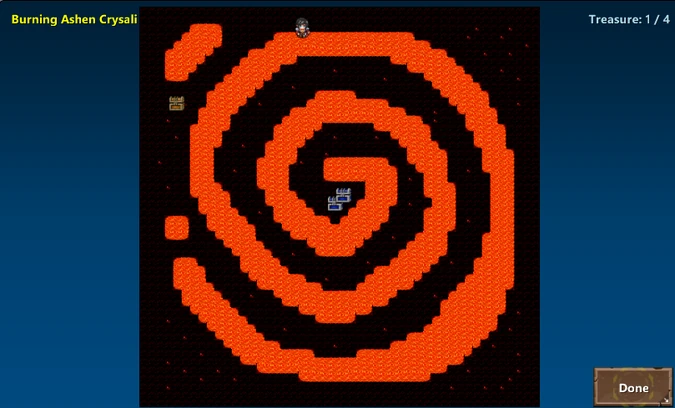
Enemies
Molten Caverns
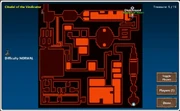
Citadel of the Vindicator-Win10
Citadel of the Vindicator
Map-beneath the big room full of lava, top left corner, is an expanse that has three chests, playing online Win10.
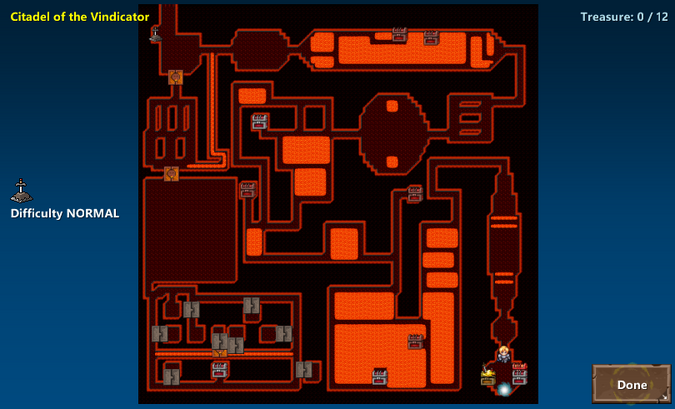
Enemies
- Stonefire Minotaur (LVL72)
- Minion of Lazurul (LVL73)
- Shade of Ash (LVL73)
Boss
- Vindicator Vyzish (LVL73)
Citadel of the Vindicator puzzle 1
Citadel of the Vindicator puzzle 2
Altar of Lazurul
Located at due north of Ashen Empire. Yous need 5 orbs from previous bosses to open up portal to Minor Rift of Flame.
Map
Minor Rift of Flame
Map
Enemies
- Royal Burn Guard (LVL75)
- Cindermage (LVL75)
- Red Dragon (LVL75)
- Stonefire Bladesong (LVL75)
- Darkmist Ravager (LVL75)
Rift of Flame
Map
Enemies
- Royal Burn Baby-sit (LVL75)
- Cindermage (LVL75)
- Red Dragon (LVL75)
- Stonefire Bladesong (LVL75)
- Darkmist Ravager (LVL75)
Rule of Lazurul
Map
Enemies
- Imperial Burn Guard (LVL75)
- Cindermage (LVL75)
- Red Dragon (LVL75)
- Stonefire Bladesong (LVL75)
- Darkmist Ravager (LVL75)
Boss
- Lazurul the Ashen Male monarch (LVL 75)(Nerf boss at Content lvl 80 lol)
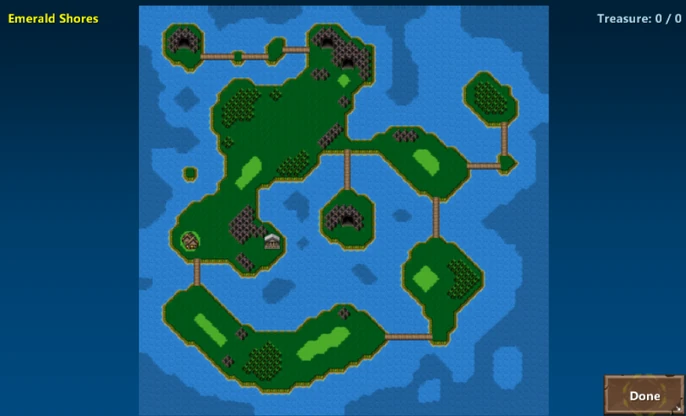
Emerald Shores
Notation: This expanse monster difficulty increases faster than before, so be careful. In dungeons, in that location are some places called "deadfall area" where you must defeat all the monsters in fixed fourth dimension. You can not apply wing of griffon or something like that to escape.
Golden Breast (GC) drop in this region: 76-78 level monsters drop GCs containing armor and raw azurite only. 79 level monsters driblet GCs containing armor, weapons and raw azurite. 80 level monsters drop GCs containing armor, accessories, weapons and raw azurite and sunstone. GC drop rate is increased when you fight in hard or nightmare manner.
Regal Chest (PC) drop in this region: PCs driblet in Nightmare mode and incorporate 4-stars items and raw corestone.
Hyrandia
In this boondocks, in that location is a npc who exchange raw materials to enchanted materials which nosotros utilise to upgrade our armors and weapons. Click to map "Hyrandia" to locate him. Crafting cost below:
- Raw emeraldium + 28000 golds to Enchanted emeraldium use to upgrade to+five
- Raw azurite + one sentinel precious stone + 56500 golds to Enchanted azurite utilise to upgrade to+9
- Raw sunstone + ii scout gems + 189000 golds to Enchanted sunstone use upgrade to+13
- Raw corestone +iii scout gems + 567000 golds to Enchanted corestone use upgrade to+xv
Emerald Shores
Enemies
- Greenfoot Goblin (LVL 76)
- Goblin Trickster (LVL 76)
- Goblin Knight (LVL 77)
- Orc Emissary (LVL 77)
Greenskin Woods
Enemies
- Ghoulish Greenfoot (LVL 78)
- Gnawbone Worm (LVL 78)
Green Caverns - (Greenskin Caverns when playing in Windows 10)
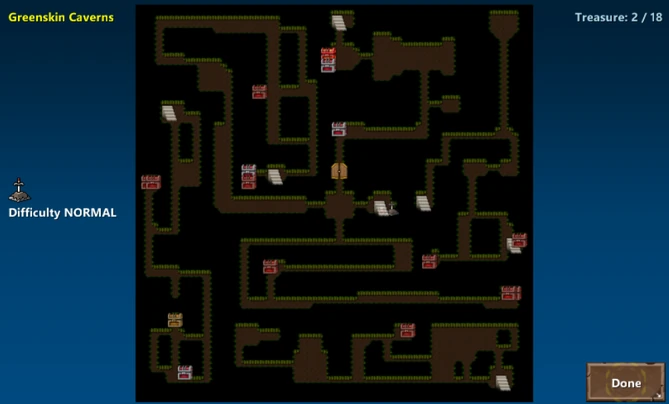
Enemies
- Evil Eye (LVL 79)
- Seething Rock Lord (LVL 79)
- Greenfoot Harbinger (LVL 80)
- Ogre Emissary (LVL lxxx)
- Sythin (LVL 80)
Stoneskin Valley
New version 3.0 is available on May eight, 2017. During this version, y'all must find Emblem of Laurels to increase max cap LVL.
After defeat Racool(Boss 80), yous tin can get Emblem of Honour in Golden breast and go to Stoneskin Valley.
If you are an erstwhile player, y'all have to kill Racool again to get Keepsake of Honor.
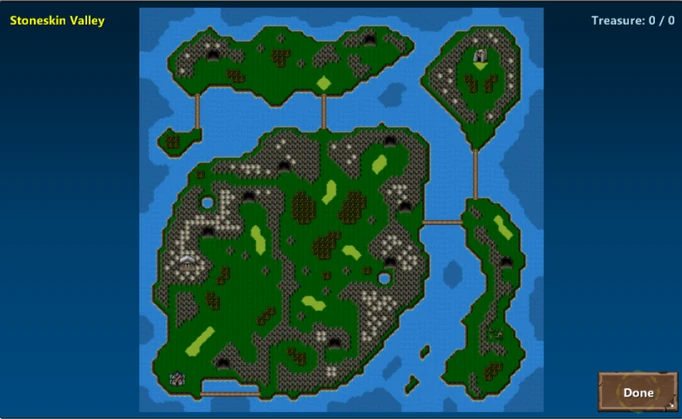
Enemies:
- Bloodfist Orc (LVL 81)
- Bloodfist Shaman (LVL 81)
- Bloodfist Helm (LVL 82)
- Nether Fungus (LVL 82)
- Infected Corpse (LVL 83)
- Bloodfist Warlock (LVL 83)
- Bloodfist Mercenary (LVL 83)
- Bloodfist Assassin (LVL 84)
- Bloodfist Enforcer (LVL 84)
Notes: Click map for more data.
This note is false, yous do not get anymore info. by Gnojuan
Next, you should visit the new town: Garum Outpost (lesser left in Stoneskin Valley) edit by Gnojuan.
Garum Outpost
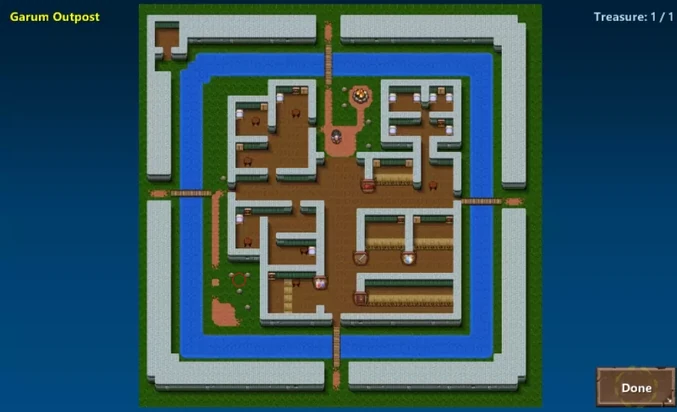
Story: By passing Racool'southward cave, nosotros reach Stoneskin valley where Orc tribe lives. There is a town covered by walls named "Garum Outpost", every bit people said they had lived and stand against Orc tribe for a long time. Following their words, Orc doesn't exist in our world, they came from another realm through a portal opened by a "foolish'" wizards. After this accident, the wizards summoned a guardian golem to prevent Orc'southward attacking. Still, even might of that golem, Orc tribe won and killed the wizards then they ruled this expanse. They wiped out all villages and farms, to survive people gathered at here and fought together to go on the terminal defend line. Nowadays, they keep protecting the town like their antecedent. Unlike goblins, Orc work in organize and absolutely follow their rex, Grulak. Without hesitation, our heroes make up one's mind to relieve this town and notice out secrets of this valley.
There is a temple called "Gal Nok" lies not far to the north where people causeless the wizards controled portal and now merely the broken golem in at that place. As well there is a rumor most a village name "Brekken" lies somewhere in Stoneskin valley.
Written past Aimer.
Side quest: You will come across a chest in the north westward. If you desire to open it, you must plough on all hidden button at Garum outpost, Umbracite Catacombs and Lost hamlet of Berkken in a sure order. Look at the map, yous will run into Fist(player in map) [ looking at the map does not tell yous Anything. edit by Gnojuan ] marking the position of the hidden buttons in social club and you have to follow that order . Upon completion you volition have huge rewards equally a powerful gems whose name is Etched Symbol of the Ogre.
Y'all should relieve at this town and start new adventure. Next go to Stoneskin valley[Garum Outpost is in Stoneskin Valley. edit by Gnojuan], move to cave in the Due north of Garum outpost. Yous encounter ii ii cave(all cavern at Stoneskin valley is Umbracite Catacombs), yous should get into the cave on your right hand.
At Correct cave(Umbracite Catacombs), yous need turn on all lever to open up door at Left cave(Umbracite Catacombs). Later turn on all lever, you go out Correct cave and move down near Garum outpost. Yous will see a bridge, become through it y'all come across a wood and go into it and find a special place that will take you to Abandoned Farmstead. [ these final 2 paragraphs are confusing and makes little sense. by Gnojuan ]
Umbracite Catacombs
At Abased Farmstead [found in the forest due east of Garum Outpost when playing in Windows 10. by Gnojuan], Going east you will see a staircase leading downwardly the Umbracite Catacombs. At this time y'all only plough on 1 lever and go to Left cave(Umbracite Catacombs). At Left cavern(Umbracite Catacombs) you lot volition see a golden chest but information technology is backside a locked door [ no such breast in Win10 ]. Then, you find all lever in cave and turn on it ===> the door will open up. You volition go Keepsake of honour 82. [ whoever wrote this does not have a grasp of the English language ]
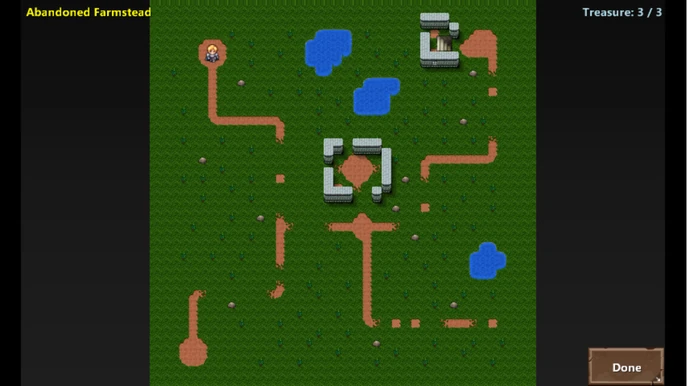
Abandoned Farmstead
Stoneskin Merchant Military camp (where is this institute?)

At Stoneskin Merchant Camp, you tin buy some detail with cheap price but y'all need buy "Fine skeleton key" (480000 gilded o.O). Card shop of Stoneskin Merchant Camp.
- 1 "Fine skeleton key" for Boss 82 to become Emblem of Honour.
- 1 "Fine skeleton fundamental" for jewel "Star Sapphire" at Merchant Camp
- 1 "Fine skeleton key" for gem "Star Amber" at Sanctum of Grulak
Full you demand buy 3 key for get all item and kill boss, merely if you don't have enough money for iii key, y'all only buy 1 for defeat Boss 82.
Side quest: If y'all look around the trees, you will find there are paths leading out from the merchant camp without leave this map. Later that, you continue to movement well-nigh the line exit map. Side by side, going north you will find a subconscious room locked. Do not worry the door will be opened with "Fine skeleton key" (buy it at Merchant Camp). You volition receive a gem: "Star Sapphire".
Stoneskin Forest

To get Emblem of honor level 83, you must enter "Stoneskin Forest", a hidden area located in middle of "Stoneskin valley". ( click on Stoneskin valley map above, I had already bookmarked it. ). Set up a "Fine skeleton key" there is a door need that to open. You will find out the door easily at southeast angle of map, open up the door, walk through the thick forest, you will come across the shade boss again. Time to battle and a reward is keepsake of level 83.
After you can reach level 83, let's detect emblem of level 84. At commencement y'all need go out this forest, there are 4 caves nigh here, the one near a lake is a mode lead to Brekken village nosotros will accept it later on. Now you enter one of the residuum, there is no need to enter each of them considering they all access to Umbracite Catacombs level 83, your work is lighting all the touches in there to open the door earlier nosotros face the shade boss who protects emblem of level 84. It will take a while to complete ( Lamentable I'll update location of all touches later on ).
Written by Aimer
Lost Hamlet of Brekken
Do you retrieve the cavern nearly the lake ? now enter and notice a way to become out the cave, that isn't likewise hard. You will face some monsters level 84, a tanker and a assassin with poison, they are quite abrasive merely the reward from them is worth your efforts. Monsters of level 84 in a higher place will drop weapon three stars and fifty-fifty armor breast pieces to complete your three stars armor fix ( happy grinding ). Cantankerous out the bridge and become downwards you will see the lost village of Brekken. Please expect, don't enter so fast, there is a boss proceed the archway and you will get battle if you enter and move. Squad up political party and defeat that abrasive boss. Afterwards battle, you volition wonder where golden chest with emblem of level 85 is, pitiful at that place isn't one XD. You lot need a shovel ( normal or golden ane ), then look at the map above at the southeast bending there is a tree surrounded by rocks dig a pigsty in front end of it, congrats !! you have reached max level this content ( DB: congrats! delight be patient to next contents it volition take a year. Happy grinding ! ).
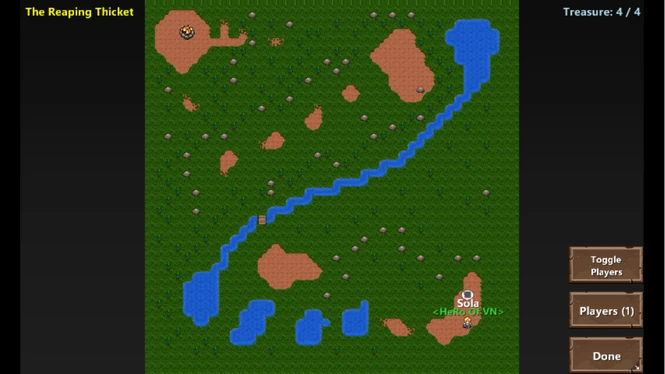
Fun fact: Do you know how to detect out that secret ? There is a rock in The Reaping Thicket says a clue nigh this secret.
Virtually this village, virtually of player suppose the best place to grind for gears, items is here. Some of them got a ton of weapons and armor pieces at here even kill count didn't reach thou. ( I'm not certain because I'one thousand a miner XD ).
I recommend you should be reached level 85, there is a stair at northwest lead us to first dominate of the Orc leaders, Pugg the Flayer. He is the easiest boss level 85, he only has a trigger which will fear all your team just almost times only tanker taken. Later defeat him, you volition get The heart of Pugg as special advantage and a summoning ball, a netherland stone.
Written past Aimer
The Reaping Thicket
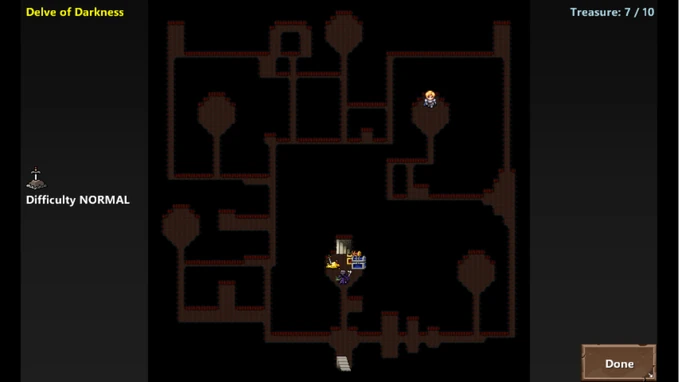
Delve of Darkness
Sanctum of Grulak
Hidden push at Sanctum of Grulak
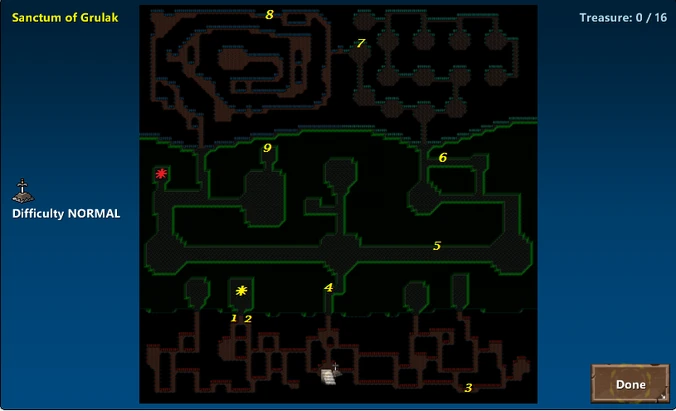
Side quest: there are 2 chest on the map
Blood-red star point(*): open up by "Fine skeleton cardinal" for 480000 golds at Stoneskin Merchant camp.
Yellow star betoken(*): open up click all hidden buttons in order and y'all have to follow that lodge (I number them on the map).
Source: https://dragons-blade-2.fandom.com/wiki/Walkthrough
0 Response to "How to Upload Different F2 Picture Blade and Soul"
Post a Comment